
LUX Mommy: DIY Mother's Day Gifts

Image + Recipe via sweetcayenne.com
1. Coffee Cup Candles - An adorbs idea that will send her over the edge! Plus collecting coffee mugs in your travels is such a fun thing to get in the habit of.
Things you will need:
A cute mug or teacup, candle wax flakes or an old candle you already have (you can melt it down or shave it yourself). You will need enough flakes to fill your mug up TWICE. Candle Wicks, pencils or chopsticks (utensil to keep your wick in place), pot or sauce pan, glass bowl or smaller pot, fragrance oil (if you want a scented candle) and scotch tape.
Instructions:
1. Fill the pot halfway with water and bring to boil. Place the glass bowl or smaller pot full of wax flakes in the pot of boiling water and wait for wax to completely melt. I had a lot of flakes, so it took mine about thirty minutes on medium to medium-high heat.
2. While your flakes are melting, get your mug ready! Place the candle wick in the center of the mug and keep it standing and centered using whatever wooden utensils (i.e. pencils, chopsticks) you have on hand. This is when the scotch tape comes in handy. You can tape the sticks together or to the mug to help it stay in place.
3. Once the wax flakes are completely melted, remove the smaller pot/bowl from the water and stir fragrance into the melted wax. I used about half a bottle of lavender fragrance oil. It smelled strong but once your candle is finished the scent will be much lighter.
4. Immediately pour the wax into your mug, being careful to keep the wick centered. Don’t move your mug around once you have poured the wax!
5. Wait! If you chose to melt or shave down an already-made candle, it will not take as long to set. If you used wax flakes, wait about 24 hours before moving the candle to be safe.
6. Trim your wick and light away, my friend.
2. Raspberry Lemon Sugar Scrub - A LUX go-to when it comes to create DIY gift ideas. We love how creative you can get with fragrances and mixes, but thought this is definitely one that Mum would love!
Ingredients:
¼ c. Coconut Oil (melted)
¾ - 1 c. granulated white sugar
2-4 drops yellow or red food coloring depending on which batch you make
10-15 drops Lemon Essential Oil or 10-15 drops Raspberry or Vanilla Extract, depending on scent you want
Instructions:
1. Melt coconut oil in microwave for 20-35 seconds until melted.
2. Pour sugar into oil and mix. If too juicy, add a small amount of sugar and mix.
3. Add food coloring to make the color you desire
4. Add Essential Oils and Extract drops(if you're blending) to achieve the scent you desire.
5. (For the Lemon Raspberry I used 10 drops Lemon EO and 10 drops Raspberry Extract)
6. Store in an air-tight container.
7. This recipe makes 2-3 small cups of scrub. To make multiple gifts or batches, double recipe.

Image + Recipe via makinghomebase.com
3. Stamped Tea Towels - Super unique and uber crafty! Use sliced citrus (or carved potatoes) coated in paint to amp up plain cloths for her kitchen.
What you'll need + easy instructions:
Citrus fruit (lemon, lime, grapefruit), fabric paint, paint brushes and flour sack tea towels. Stamping tips: The fruit can be pretty juicy so it’s a good idea to blot the lemon half a few times before brushing on the paint. Also, don’t go too heavy on the paint, just enough to cover the whole lemon half, but if you brush on too much you will just get a big paint blob. I tested out a few stamps on a piece of paper towel to get the right amount of paint.
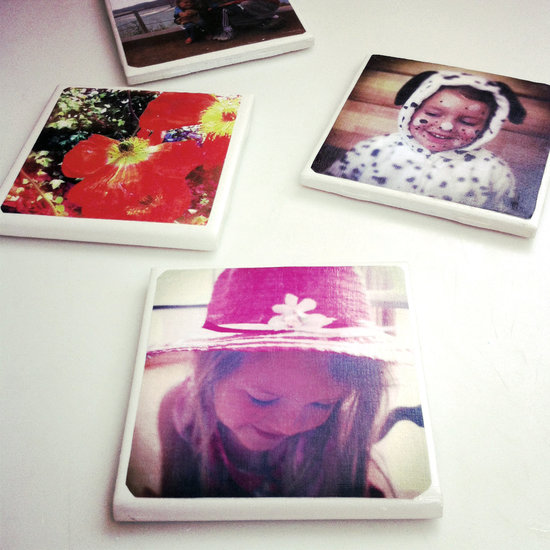
Image + Recipe via popsugar.com
4. Personalized Tile Coasters - A set of these tile photo coasters will cost less than $5 to make. The square tiles from your local home goods store makes this DIY a unique way to showcase your favorite Hipstamatic and Instagram snaps. All you need is some Mod Podge and a bit of felt to complete this fun project. Stack and wrap the finished photo coasters with a ribbon, and you've got the perfect gift for her.
What You'll Need:
Four 4-by-4-inch white tiles
Four 4-by-4-inch square pictures
Scissors
Mod Podge
Foam brush
Felt
Hot glue gun
Length of ribbon
Clear spray sealant
Directions:
Pick up small white tiles at your local home goods store, which will run you less than a dollar each. You can also go with a colored tile for a more personalized DIY. Select pictures to use for the project, resize to four by four inches on your computer, then print. Select images to fit the special day, such as cute shots of your nieces and nephews for Mother's Day, snow-filled pictures for the holiday seasons, or fun snaps for a special birthday.
Cut out the pictures, rounding the edges, which gives the finished photo coasters a nice look. Coat the front of the tile with a thin layer of Mod Podge, then center and press a picture to the tile. Let dry for 20 minutes, then coat the top of the picture with a light coating of Mod Podge, brushing horizontally then vertically. Let dry for another 20 minutes and then lightly coat again, sealing the top of the coaster and ensuring the photo is completely adhered to the tile.
Cut four small one-inch squares from the felt for each tile, and use a hot glue gun to stick one square of felt to each corner of the tile. Give the dry photo coasters a quick coat of clear spray sealant, which will completely moisture-proof the finished project.
Wrap the finished stacked tile photo coasters with a length of ribbon, and they are ready to give to someone special. Or keep them for yourself and enjoy the next time you're savoring your favorite beverage.

Image + Recipe via visiblymoved.blogspot.com
5. Drift Wood Necklace Holder - There's something magical about the combo of driftwood plus eccentric knobs that make this project so awesome. Plus it's rooted in function!
1. You will need a flat board to attach your knobs unto. You can be creative with this, but drift wood is dreamy. Collect some unique / eccentric knobs from thrift stores and random spots.
2. Measure and drill the holes for your knobs. Be mindful of the length between each hole to keep the width apart consistent.
3. Attach your knobs to the board using the already drilled holes.
4. Attach the finished project to the wall and hang your necklaces!

